其实我之前有在博客里总结自己每个学期都做过什么事,但是最近几年几乎没有了,反而自己的博客变成了一个自己的技术总结,虽然也没有几篇吧。前几天听播客,说到如何提高自己的写作和观察生活的能力,记日记其实是个很好的方式。所以从今天起,我打算每周至少写一篇日记,用来记录一下自己的生活,就像自己存照片一样。希望多年后,回头看回来,能给自己一些回忆吧……哦对,我是打算在手机上写,比较方便一点,就不在这里公开了……
如何转播电视信号并通过网页观看
前几天给大家简单介绍了一下如何使用树莓派搭建一个RTMP直播服务,并可以通过vlc等工具观看。这几天,我又改进了一下整个系统,现在可以通过网页观看直播,并通过MQTT服务控制一个Arduino发送红外信号,控制机顶盒。
现在,整套系统有这么几个东西。
- 机顶盒
- 通过网络接受直播信号
- 采集卡
- 采集机顶盒信号,并推送给PC
- PC
- 接受来自采集卡的信号,并推送给RTMP直播服务
- 树莓派
- RTMP服务,接收并转发视频信号
- MMQT服务,通过网络发送信息给Arduino
- PHP服务,通过网页收看直播,发送MMQT信息
- Ardunio
- 接收MMQT的信息,并根据信息发送红外信号控制机顶盒
机顶盒,采集卡,PC方面的事情就不详细说了,今天主要说一下树莓派和Ardunio的东西。
树莓派方面,还是给大家写了一个script,大家修改后可以直接运行。我也加了一些comment在里面。注意替换<your ip>, <your port>, <your service>之类的位置,运行之前记得搜一下有没有“<your”开头的地方,还有没有没有替换的
#!/bin/bash

# Raspberry Pi 5 RTMP Streaming Server Setup Script
# Installs NGINX with RTMP, configures HLS, and sets up systemd service
# Installs PHP and MMQT service

set -e

echo "🚀 Updating system..."
apt update && apt upgrade -y

echo "📦 Installing dependencies..."
apt install -y build-essential libpcre3 libpcre3-dev libssl-dev zlib1g-dev git wget


echo "📦 Installing mosquitto and mosquitto-clients..."
apt install -y mosquitto mosquitto-clients

echo "🔁 Enabling and starting mosquitto service..."
systemctl enable mosquitto
systemctl start mosquitto

echo "⚙️  Configuring Mosquitto for WebSockets..."
MOSQ_CONF="/etc/mosquitto/mosquitto.conf"

# Backup original config
cp $MOSQ_CONF ${MOSQ_CONF}.bak

cat <<EOF > $MOSQ_CONF
# Place your local configuration in /etc/mosquitto/conf.d/
#
# A full description of the configuration file is at
# /usr/share/doc/mosquitto/examples/mosquitto.conf.example

pid_file /run/mosquitto/mosquitto.pid

persistence true
persistence_location /var/lib/mosquitto/

log_dest file /var/log/mosquitto/mosquitto.log

include_dir /etc/mosquitto/conf.d

# MQTT listener
listener 1883
protocol mqtt

# WebSocket listener
listener 9001
protocol websockets

allow_anonymous true

# Optional authentication (uncomment below to enable)
# allow_anonymous false
# password_file /etc/mosquitto/passwd
EOF

echo "🔁 Restarting Mosquitto..."
systemctl restart mosquitto

echo "📦 Installing PHP and FPM..."
apt install -y php php-fpm php-cli

echo "✅ Ensuring PHP-FPM is running..."
# Double check the version of php
systemctl enable php8.2-fpm
systemctl start php8.2-fpm

echo "🌐 Downloading NGINX and RTMP module..."
cd /opt
git clone https://github.com/arut/nginx-rtmp-module.git
wget http://nginx.org/download/nginx-1.27.5.tar.gz
tar -zxvf nginx-1.27.5.tar.gz
cd nginx-1.27.5

echo "⚙️ Building NGINX with RTMP module..."
./configure --with-http_ssl_module --add-module=../nginx-rtmp-module
make -j$(nproc)
make install

echo "📝 Writing NGINX config with RTMP + HLS..."
cat > /usr/local/nginx/conf/nginx.conf <<'EOF'
user www-data;
worker_processes  1;

events {
    worker_connections  1024;
}

http {
    sendfile off;
    tcp_nopush on;
    directio 512;

    server {
        listen <your port>;
        root html;
    index index.php index.html index.htm;
        location / {
            try_files $uri $uri/ =404;
    }

    location ~ \.php$ {
        include fastcgi_params;
        fastcgi_param SCRIPT_FILENAME $document_root$fastcgi_script_name;
        fastcgi_pass unix:/run/php/php8.2-fpm.sock;  # Update based on your PHP version
        }

        location /hls {
            types {
                application/vnd.apple.mpegurl m3u8;
                video/mp2t ts;
            }
            root /tmp;
            add_header Cache-Control no-cache;
            add_header 'Access-Control-Allow-Origin' '*';
        }

    }
}

rtmp {
    server {
        listen 1935;
        chunk_size 4096;

        application <your service> {
            live on;
            record off;
            hls on;
            hls_path /tmp/hls;
            hls_fragment 3s;
            hls_playlist_length 60s;
        }
    }
}
EOF

echo "📁 Creating HLS output directory..."
mkdir -p /tmp/hls

echo "🔧 Creating systemd service for NGINX RTMP..."
cat > /etc/systemd/system/nginx-rtmp.service <<EOF
[Unit]
Description=NGINX RTMP Streaming Server
After=network.target

[Service]
ExecStart=/usr/local/nginx/sbin/nginx
ExecReload=/usr/local/nginx/sbin/nginx -s reload
ExecStop=/usr/local/nginx/sbin/nginx -s stop
PIDFile=/usr/local/nginx/logs/nginx.pid
Type=forking
Restart=on-failure

[Install]
WantedBy=multi-user.target
EOF

echo "🔁 Enabling and starting NGINX service..."
systemctl daemon-reexec
systemctl daemon-reload
systemctl enable nginx-rtmp
systemctl start nginx-rtmp


echo "📄 Creating MQTT PHP script..."
cat > /usr/local/nginx/html/send.php <<'EOF'
<?php
// Simple security token (optional)
$secret = $_POST['key'] ?? '';
if ($secret !== '<your key2>') {
    http_response_code(403);
    echo json_encode(['error' => 'Unauthorized']);
    exit;
}

$msg = $_POST['msg'] ?? '';

// Publish to Mosquitto
$cmd = escapeshellcmd("mosquitto_pub -h localhost -t 'tv/remote' -m '$msg'");
exec($cmd, $output, $retval);

echo json_encode([
    'status' => $retval === 0 ? 'sent' : 'error',
    'msg' => $msg
]);
?>
EOF

cat > /usr/local/nginx/html/index.php <<'EOF'
<?php
$key = $_GET['key'] ?? '';
if ($key !== '<your key1>') {
    http_response_code(403);
    echo json_encode(['error' => 'Unauthorized']);
    exit;
}
$channels = [
    '体育频道' => [
        ['msg' => 's00720', 'name' => '纬来体育'],
        ['msg' => 's00721', 'name' => '纬来体育 备用'],
        ['msg' => 's01420', 'name' => 'ELTA体育1'],
        ['msg' => 's01421', 'name' => 'ELTA体育1 备用'],
        ['msg' => 's01430', 'name' => 'ELTA体育2'],
        ['msg' => 's01431', 'name' => 'ELTA体育2 备用'],
        ['msg' => 's01440', 'name' => 'ELTA体育3'],
        ['msg' => 's01441', 'name' => 'ELTA体育3 备用1'],
        ['msg' => 's01442', 'name' => 'ELTA体育3 备用2'],
        ['msg' => 's01450', 'name' => 'ELTA体育4'],
        ['msg' => 's01451', 'name' => 'ELTA体育4 备用'],
    ],
    'Reboot' => [
        ['msg' => 'r', 'name' => 'Reboot TV Box'],
        ['msg' => 'a', 'name' => 'Reboot TV App']
    ]
];

$secretKey = '<your key2>';
$streamKey = '<your stream key>';
?>

<!DOCTYPE html>
<html lang="zh-CN">
<head>
    <meta charset="UTF-8">
    <meta name="viewport" content="width=device-width, initial-scale=1.0">
    <title>TV Streaming Panel</title>
    <style>
        body {
            margin: 0;
            font-family: "Segoe UI", sans-serif;
            background: #1c1c1c;
            color: white;
            display: flex;
            flex-direction: row;
            height: 100vh;
        }

        #player-container {
            flex: 1;
            background: black;
            display: flex;
            align-items: center;
            justify-content: center;
        }

        video {
            width: 100%;
            height: 100%;
            background: black;
        }

        #sidebar {
            width: 300px;
            background: #2b2b2b;
            border-left: 2px solid #444;
            overflow-y: auto;
            padding: 20px;
            box-shadow: -2px 0 10px rgba(0,0,0,0.5);
            transition: width 0.3s ease;
        }

        h2 {
            font-size: 20px;
            color: #00bfff;
            margin: 0 0 10px;
        }

        .category {
            margin-bottom: 10px;
        }

        .category-header {
            font-size: 16px;
            font-weight: bold;
            cursor: pointer;
            padding: 8px;
            background-color: #333;
            border-radius: 4px;
            user-select: none;
        }

        .category-header .arrow {
            display: inline-block;
            width: 1.2em;
        }

        .channel-list {
            display: none;
            margin-top: 5px;
            margin-left: 10px;
        }

        .channel-btn {
            display: block;
            width: 100%;
            margin: 6px 0;
            padding: 10px;
            background: #00bfff;
            color: #fff;
            border: none;
            border-radius: 6px;
            font-size: 14px;
            cursor: pointer;
            text-align: left;
        }

        .channel-btn:hover {
            background: #0099cc;
        }

        .status {
            margin-top: 20px;
            font-size: 14px;
            color: #ccc;
        }

        /* 📱 Responsive styles */
        @media screen and (max-width: 768px) {
            body {
                flex-direction: column;
            }

            #sidebar {
                width: 100%;
                border-left: none;
                border-top: 2px solid #444;
                padding: 10px;
            }

            h2 {
                font-size: 18px;
            }

            .channel-btn {
                font-size: 16px;
                padding: 12px;
            }

            .category-header {
                font-size: 18px;
                padding: 10px;
            }
        }
    </style>
</head>
<body>

<div id="player-container">
    <video id="video" controls autoplay muted></video>
</div>

<div id="sidebar">
    <h2>Channel List</h2>

    <?php foreach ($channels as $category => $items): ?>
        <div class="category">
            <div class="category-header" onclick="toggleCategory(this)">
                <span class="arrow">▶</span> <?php echo htmlspecialchars($category); ?>
            </div>
            <div class="channel-list">
                <?php foreach ($items as $channel): ?>
                    <button class="channel-btn" onclick="changeChannel('<?php echo $channel['msg']; ?>')">
                        <?php echo htmlspecialchars($channel['name']); ?>
                    </button>
                <?php endforeach; ?>
            </div>
        </div>
    <?php endforeach; ?>

    <div class="status" id="status">Status: Ready</div>
</div>

<script src="https://cdn.jsdelivr.net/npm/hls.js@latest"></script>
<script>
    const streamKey = "<?php echo $streamKey; ?>";
    const secretKey = "<?php echo $secretKey; ?>";
    const video = document.getElementById('video');
    const statusBox = document.getElementById('status');
    const src = 'http://<your ip>:<your port>/hls/' + streamKey + '.m3u8';

    if (Hls.isSupported()) {
        const hls = new Hls();
        hls.loadSource(src);
        hls.attachMedia(video);
    } else if (video.canPlayType('application/vnd.apple.mpegurl')) {
        video.src = src;
    }

    function changeChannel(msg) {
        statusBox.textContent = "Sending msg: " + msg + "...";

        fetch('send.php', {
            method: 'POST',
            headers: { 'Content-Type': 'application/x-www-form-urlencoded' },
            body: new URLSearchParams({
                msg: msg,
                key: secretKey
            })
        })
        .then(res => res.json())
        .then(data => {
            if (data.status === 'sent') {
                statusBox.textContent = "✅ Msg sent: " + msg;
            } else {
                statusBox.textContent = "❌ Failed: " + (data.error || 'Unknown error');
            }
        })
        .catch(err => {
            statusBox.textContent = "❌ Network error: " + err.message;
        });
    }

    function toggleCategory(header) {
        const list = header.nextElementSibling;
        const arrow = header.querySelector('.arrow');
        const open = list.style.display === 'block';

        list.style.display = open ? 'none' : 'block';
        arrow.textContent = open ? '▶' : '▼';
    }

    // Auto-expand the first category on load
    document.addEventListener("DOMContentLoaded", () => {
        const firstHeader = document.querySelector(".category-header");
        if (firstHeader) toggleCategory(firstHeader);
    });
</script>

</body>
</html>
EOF

echo ""
echo "✅ All done!"
echo ""
echo "🎥 Set OBS to stream to: rtmp://<your ip>/<your service>/<your stream key>"
echo "📺 Watch via VLC or player: rtmp://<your ip>/<your service>/<your stream key>"
echo "🌐 Or in browser (HLS): http://<your ip>:<your port>/hls/<your stream key>.m3u8"
echo "✅ Setup complete. Visit http://<your ip>:<your port>/index.php?key=<your key1> to test."
总体来讲,这个script会安装nginx,并且设置php,rtmp,mmqt服务。并通过一个简单的网页实现从网页上观看直播信号,并通过mmqt发送一些信息出去。不过网页的安全性不是很高,基本授权是通过get发送一个密码,并检查这个强密码和script里hard code的密码一样不一样。另外一个事就是,因为网页端使用的HLS服务,会有大概30秒的延迟。如果用VLC直接观看rtmp信号的话,延迟会小很多。
Ardunio方面,要做两件事,第一件事是通过IR receiver来学习遥控器的信号。
#include <IRremote.h>

void setup() {
  Serial.begin(9600);
  IrReceiver.begin(8, ENABLE_LED_FEEDBACK); // Receiver connected to pin 8
  Serial.println("Ready to receive IR signal...");
}

void loop() {
  if (IrReceiver.decode()) {
    // Print full raw dump for replay later
    IrReceiver.printIRResultShort(&Serial);
    IrReceiver.printIRSendUsage(&Serial);
    Serial.println();
    IrReceiver.resume(); // Ready to receive the next
  }
}
首先,我是把接收器安装在了Ardunio的8号接口,这时,就可以用这个接收器看遥控器发出来的信号是什么了。比如,当我按确认键,就会收到一下信息
Protocol=NEC Address=0xFF40 Command=0xD Raw-Data=0xF20DFF40 32 bits LSB first Gap=1940000us Duration=68650us
	Send with: IrSender.sendNEC(0xFF40, 0xD, <numberOfRepeats>);
这时我们就知道,可以发送什么样的信号了。当学习完所有的需要按的信号后,就可以进入下一步。简单来说,就是连接WIFI(我用的Arduino 4 withi wifi),然后连接MMQT的服务(搭设在树莓派上的)。通过MMQT接收到什么信息,就解析出来,并执行相应的操作。比如我这里,s开头的信息,表示要选台,他会输入台号,并执行一些其他的操作。如果收到r,表示重启机顶盒,他会模拟遥控器的几次操作。这边可能就不能直接抄了,需要你自己修改一下。另外,当发送什么按键的时候,Arduino的灯就会亮起一个相应的数字或者按键,方便我知道发送的啥信号。
#include "Arduino_LED_Matrix.h"
#include <IRremote.h>
#include <PubSubClient.h>
#include "WiFiS3.h"
#include "secrets.h"

ArduinoLEDMatrix matrix;
char ssid[] = <your wifi ssid>;        // your network SSID (name)
char pass[] = <your wifi pwd>;    // your network password (use for WPA)
int status = WL_IDLE_STATUS;

// MQTT broker settings
const char* mqtt_server = "<your ip>"; // your Raspberry Pi IP address
const int mqtt_port = 1883;
const char* mqtt_topic = "tv/remote";

WiFiClient wifiClient;
PubSubClient client(wifiClient);

void setup() {
  Serial.begin(9600);      // initialize serial communication

  // check for the WiFi module:
  if (WiFi.status() == WL_NO_MODULE) {
    Serial.println("Communication with WiFi module failed!");
    // don't continue
    while (true);
  }

  String fv = WiFi.firmwareVersion();
  if (fv < WIFI_FIRMWARE_LATEST_VERSION) {
    Serial.println("Please upgrade the firmware");
  }

  // attempt to connect to WiFi network:
  while (status != WL_CONNECTED) {
    Serial.print("Attempting to connect to Network named: ");
    Serial.println(ssid);                   // print the network name (SSID);

    // Connect to WPA/WPA2 network. Change this line if using open or WEP network:
    status = WiFi.begin(ssid, pass);
    // wait 10 seconds for connection:
    delay(10000);
  }
  printWifiStatus();                        // you're connected now, so print out the status

  client.setServer(mqtt_server, mqtt_port);
  client.setCallback(callback);

  matrix.begin();
  IrSender.begin(7); // Transmitter LED connected to pin 7
}

void loop() {
  // Reconnect Wi-Fi if disconnected
  if (WiFi.status() != WL_CONNECTED) {
    Serial.println("WiFi disconnected. Attempting reconnection...");
    while (WiFi.status() != WL_CONNECTED) {
      status = WiFi.begin(ssid, pass);
      delay(10000); // Wait for connection
    }
    printWifiStatus(); // Print new status once connected
  }

  // Reconnect MQTT if needed
  if (!client.connected()) {
    reconnect();
  }
  client.loop();
}

void callback(char* topic, byte* message, unsigned int length) {
  Serial.print("Message arrived [");
  Serial.print(topic);
  Serial.print("]: ");
  for (int i = 0; i < length; i++) {
    Serial.print((char)message[i]);
  }
  Serial.println();

  execute(String((char*)message));
}

void reconnect() {
  unsigned long startAttemptTime = millis();

  while (!client.connected()) {
    Serial.print("Attempting MQTT connection...");
    if (client.connect("arduinoClient")) {
      Serial.println("connected");
      client.subscribe(mqtt_topic);
    } else {
      Serial.print("failed, rc=");
      Serial.print(client.state());
      delay(2000);

      // Timeout after 30 seconds
      if (millis() - startAttemptTime > 30000) {
        Serial.println("MQTT reconnect timeout");
        break;
      }
    }
  }
}

void execute(String message) {
  char c = message[0];
  int i;
  int j;
  int num;
  switch(c) {
    case 's': // channel selection
      for (i = 1; i < message.length(); i++) {
        c = message[i];
        if (i < 5) { // channel number, 4 digits
          sendSignal(c);
          delay(500);
        }
        if (i == 5) { // process the last digit
          sendSignal('o'); // press ok
          num = c - '0'; // convert char to int
          delay(3000);
          for (j = 0; j < num; j++) {
            sendSignal('d'); // press 'down' based on the last digit
            delay(500);
          }
          if (num > 0) { // if 'down' is pressed, press 'ok'
            sendSignal('o');
          } else {
            sendSignal('b'); // close menu
          }
        }
      }
      break;
    case 'r': // restart tv box
      sendSignal('p'); // open power menu
      delay(1000);
      sendSignal('d'); // press down
      delay(1000);
      sendSignal('d'); // select reboot
      delay(1000);
      sendSignal('o'); // reboot
      delay(45000);
      sendSignal('o');
      delay(2000);
      sendSignal('r');
      delay(1000);
      sendSignal('r');
      delay(1000);
      sendSignal('o'); // select tv app
      delay(1000);
      sendSignal('o'); // enter tv app
      delay(10000);
      sendSignal('b'); // enter tv
      break;
    case 'a': // restart tv app
      sendSignal('b'); // back
      delay(1000);
      sendSignal('u'); // select quit
      delay(1000);
      sendSignal('o'); // confirm quit
      delay(3000);
      sendSignal('o'); // select tv
      delay(1000);
      sendSignal('o'); // enter tv
      delay(10000);
      sendSignal('b'); // enter tv
      break;
  }

  delay(1000);
  clearScreen();
}

void sendSignal(char c) {
  switch(c) {
    case '0':
      show0();
      IrSender.sendNEC(0xFF40, 0x0, 1);
      break;
    case '1':
      show1();
      IrSender.sendNEC(0xFF40, 0x1, 1);
      break;
    case '2':
      show2();
      IrSender.sendNEC(0xFF40, 0x2, 1);
      break;
    case '3':
      show3();
      IrSender.sendNEC(0xFF40, 0x3, 1);
      break;
    case '4':
      show4();
      IrSender.sendNEC(0xFF40, 0x4, 1);
      break;
    case '5':
      show5();
      IrSender.sendNEC(0xFF40, 0x5, 1);
      break;
    case '6':
      show6();
      IrSender.sendNEC(0xFF40, 0x6, 1);
      break;
    case '7':
      show7();
      IrSender.sendNEC(0xFF40, 0x7, 1);
      break;
    case '8':
      show8();
      IrSender.sendNEC(0xFF40, 0x8, 1);
      break;
    case '9':
      show9();
      IrSender.sendNEC(0xFF40, 0x9, 1);
      break;
    case 'o':
      showOK();
      IrSender.sendNEC(0xFF40, 0xD, 1);
      break;
    case 'b':
      showBack();
      IrSender.sendNEC(0xFF40, 0x42, 1);
      break;
    case 'p':
      showPower();
      IrSender.sendNEC(0xFF40, 0x4D, 1);
      break;
    case 'u':
      showUp();
      IrSender.sendNEC(0xFF40, 0xB, 1);
      break;
    case 'd':
      showDown();
      IrSender.sendNEC(0xFF40, 0xE, 1);
      break;
    case 'l':
      showLeft();
      IrSender.sendNEC(0xFF40, 0x10, 1);
      break;
    case 'r':
      showRight();
      IrSender.sendNEC(0xFF40, 0x11, 1);
      break;
  }
}

void show0() {
  byte frame[8][12] = {
    { 0, 0, 0, 0, 0, 1, 1, 0, 0, 0, 0, 0 },
    { 0, 0, 0, 0, 1, 0, 0, 1, 0, 0, 0, 0 },
    { 0, 0, 0, 1, 0, 0, 0, 0, 1, 0, 0, 0 },
    { 0, 0, 0, 1, 0, 0, 0, 0, 1, 0, 0, 0 },
    { 0, 0, 0, 1, 0, 0, 0, 0, 1, 0, 0, 0 },
    { 0, 0, 0, 1, 0, 0, 0, 0, 1, 0, 0, 0 },
    { 0, 0, 0, 0, 1, 0, 0, 1, 0, 0, 0, 0 },
    { 0, 0, 0, 0, 0, 1, 1, 0, 0, 0, 0, 0 }
  };
  matrix.renderBitmap(frame, 8, 12);
}

void show1() {
  byte frame[8][12] = {
    { 0, 0, 0, 0, 0, 1, 0, 0, 0, 0, 0, 0 },
    { 0, 0, 0, 0, 1, 1, 0, 0, 0, 0, 0, 0 },
    { 0, 0, 0, 0, 0, 1, 0, 0, 0, 0, 0, 0 },
    { 0, 0, 0, 0, 0, 1, 0, 0, 0, 0, 0, 0 },
    { 0, 0, 0, 0, 0, 1, 0, 0, 0, 0, 0, 0 },
    { 0, 0, 0, 0, 0, 1, 0, 0, 0, 0, 0, 0 },
    { 0, 0, 0, 0, 0, 1, 0, 0, 0, 0, 0, 0 },
    { 0, 0, 0, 0, 1, 1, 1, 0, 0, 0, 0, 0 }
  };
  matrix.renderBitmap(frame, 8, 12);
}

void show2() {
  byte frame[8][12] = {
    { 0, 0, 0, 0, 1, 1, 1, 1, 0, 0, 0, 0 },
    { 0, 0, 0, 1, 1, 0, 0, 1, 1, 0, 0, 0 },
    { 0, 0, 0, 0, 0, 0, 0, 0, 1, 1, 0, 0 },
    { 0, 0, 0, 0, 0, 0, 0, 1, 1, 0, 0, 0 },
    { 0, 0, 0, 0, 0, 0, 1, 1, 0, 0, 0, 0 },
    { 0, 0, 0, 0, 0, 1, 1, 0, 0, 0, 0, 0 },
    { 0, 0, 0, 1, 1, 0, 0, 0, 0, 0, 0, 0 },
    { 0, 0, 1, 1, 1, 1, 1, 1, 1, 1, 0, 0 }
  };
  matrix.renderBitmap(frame, 8, 12);
}

void show3() {
  byte frame[8][12] = {
    { 0, 0, 0, 1, 1, 1, 1, 0, 0, 0, 0, 0 },
    { 0, 0, 1, 1, 0, 0, 1, 1, 0, 0, 0, 0 },
    { 0, 0, 0, 0, 0, 0, 0, 1, 1, 0, 0, 0 },
    { 0, 0, 0, 0, 0, 1, 1, 1, 0, 0, 0, 0 },
    { 0, 0, 0, 0, 0, 0, 0, 1, 1, 0, 0, 0 },
    { 0, 0, 0, 0, 0, 0, 0, 1, 1, 0, 0, 0 },
    { 0, 0, 1, 1, 0, 0, 1, 1, 0, 0, 0, 0 },
    { 0, 0, 0, 1, 1, 1, 1, 0, 0, 0, 0, 0 }
  };
  matrix.renderBitmap(frame, 8, 12);
}

void show4() {
  byte frame[8][12] = {
    { 0, 0, 0, 0, 0, 0, 0, 1, 1, 0, 0, 0 },
    { 0, 0, 0, 0, 0, 0, 1, 1, 1, 0, 0, 0 },
    { 0, 0, 0, 0, 0, 1, 1, 1, 1, 0, 0, 0 },
    { 0, 0, 0, 0, 1, 1, 0, 1, 1, 0, 0, 0 },
    { 0, 0, 0, 1, 1, 0, 0, 1, 1, 0, 0, 0 },
    { 0, 0, 1, 1, 1, 1, 1, 1, 1, 1, 0, 0 },
    { 0, 0, 0, 0, 0, 0, 0, 1, 1, 0, 0, 0 },
    { 0, 0, 0, 0, 0, 0, 0, 1, 1, 0, 0, 0 }
  };
  matrix.renderBitmap(frame, 8, 12);
}

void show5() {
  byte frame[8][12] = {
    { 0, 0, 1, 1, 1, 1, 1, 1, 1, 0, 0, 0 },
    { 0, 0, 1, 1, 0, 0, 0, 0, 0, 0, 0, 0 },
    { 0, 0, 1, 1, 1, 1, 1, 0, 0, 0, 0, 0 },
    { 0, 0, 0, 0, 0, 0, 1, 1, 0, 0, 0, 0 },
    { 0, 0, 0, 0, 0, 0, 0, 1, 1, 0, 0, 0 },
    { 0, 0, 0, 0, 0, 0, 0, 1, 1, 0, 0, 0 },
    { 0, 0, 1, 1, 0, 0, 1, 1, 0, 0, 0, 0 },
    { 0, 0, 0, 1, 1, 1, 1, 0, 0, 0, 0, 0 }
  };
  matrix.renderBitmap(frame, 8, 12);
}

void show6() {
  byte frame[8][12] = {
    { 0, 0, 0, 0, 1, 1, 1, 1, 0, 0, 0, 0 },
    { 0, 0, 0, 1, 1, 0, 0, 1, 1, 0, 0, 0 },
    { 0, 0, 1, 1, 0, 0, 0, 0, 0, 0, 0, 0 },
    { 0, 0, 1, 1, 1, 1, 1, 1, 0, 0, 0, 0 },
    { 0, 0, 1, 1, 0, 0, 0, 1, 1, 0, 0, 0 },
    { 0, 0, 1, 1, 0, 0, 0, 1, 1, 0, 0, 0 },
    { 0, 0, 0, 1, 1, 0, 1, 1, 0, 0, 0, 0 },
    { 0, 0, 0, 0, 1, 1, 1, 0, 0, 0, 0, 0 }
  };
  matrix.renderBitmap(frame, 8, 12);
}

void show7() {
  byte frame[8][12] = {
    { 0, 0, 1, 1, 1, 1, 1, 1, 1, 1, 0, 0 },
    { 0, 0, 0, 0, 0, 0, 0, 0, 1, 1, 0, 0 },
    { 0, 0, 0, 0, 0, 0, 0, 1, 1, 0, 0, 0 },
    { 0, 0, 0, 0, 0, 0, 1, 1, 0, 0, 0, 0 },
    { 0, 0, 0, 0, 0, 1, 1, 0, 0, 0, 0, 0 },
    { 0, 0, 0, 0, 1, 1, 0, 0, 0, 0, 0, 0 },
    { 0, 0, 0, 1, 1, 0, 0, 0, 0, 0, 0, 0 },
    { 0, 0, 1, 1, 0, 0, 0, 0, 0, 0, 0, 0 }
  };
  matrix.renderBitmap(frame, 8, 12);
}

void show8() {
  byte frame[8][12] = {
    { 0, 0, 0, 0, 1, 1, 1, 1, 0, 0, 0, 0 },
    { 0, 0, 0, 1, 1, 0, 0, 1, 1, 0, 0, 0 },
    { 0, 0, 0, 1, 1, 0, 0, 1, 1, 0, 0, 0 },
    { 0, 0, 0, 0, 1, 1, 1, 1, 0, 0, 0, 0 },
    { 0, 0, 0, 1, 1, 0, 0, 1, 1, 0, 0, 0 },
    { 0, 0, 0, 1, 1, 0, 0, 1, 1, 0, 0, 0 },
    { 0, 0, 0, 1, 1, 0, 0, 1, 1, 0, 0, 0 },
    { 0, 0, 0, 0, 1, 1, 1, 1, 0, 0, 0, 0 }
  };
  matrix.renderBitmap(frame, 8, 12);
}

void show9() {
  byte frame[8][12] = {
    { 0, 0, 0, 0, 1, 1, 1, 1, 0, 0, 0, 0 },
    { 0, 0, 0, 1, 1, 0, 0, 1, 1, 0, 0, 0 },
    { 0, 0, 0, 1, 1, 0, 0, 1, 1, 0, 0, 0 },
    { 0, 0, 0, 0, 1, 1, 1, 1, 1, 0, 0, 0 },
    { 0, 0, 0, 0, 0, 0, 0, 1, 1, 0, 0, 0 },
    { 0, 0, 0, 0, 0, 0, 0, 1, 1, 0, 0, 0 },
    { 0, 0, 0, 1, 1, 0, 0, 1, 1, 0, 0, 0 },
    { 0, 0, 0, 0, 1, 1, 1, 1, 0, 0, 0, 0 }
  };
  matrix.renderBitmap(frame, 8, 12);
}

void showOK() {
  byte frame[8][12] = {
    { 0, 0, 1, 1, 0, 0, 1, 0, 0, 0, 1, 0 },
    { 0, 1, 0, 0, 1, 0, 1, 0, 0, 1, 0, 0 },
    { 0, 1, 0, 0, 1, 0, 1, 0, 1, 0, 0, 0 },
    { 0, 1, 0, 0, 1, 0, 1, 1, 0, 0, 0, 0 },
    { 0, 1, 0, 0, 1, 0, 1, 1, 0, 0, 0, 0 },
    { 0, 1, 0, 0, 1, 0, 1, 0, 1, 0, 0, 0 },
    { 0, 1, 0, 0, 1, 0, 1, 0, 0, 1, 0, 0 },
    { 0, 0, 1, 1, 0, 0, 1, 0, 0, 0, 1, 0 }
  };
  matrix.renderBitmap(frame, 8, 12);
}

void showBack() {
  byte frame[8][12] = {
    { 0, 0, 0, 0, 0, 0, 0, 0, 0, 0, 0, 0 },
    { 0, 0, 0, 1, 0, 0, 0, 0, 0, 0, 0, 0 },
    { 0, 0, 1, 1, 1, 1, 1, 1, 0, 0, 0, 0 },
    { 0, 0, 0, 1, 0, 0, 0, 0, 1, 0, 0, 0 },
    { 0, 0, 0, 0, 0, 0, 0, 0, 1, 0, 0, 0 },
    { 0, 0, 0, 0, 0, 0, 0, 0, 1, 0, 0, 0 },
    { 0, 0, 1, 1, 1, 1, 1, 1, 0, 0, 0, 0 },
    { 0, 0, 0, 0, 0, 0, 0, 0, 0, 0, 0, 0 }
  };
  matrix.renderBitmap(frame, 8, 12);
}

void showPower() {
  byte frame[8][12] = {
    { 0, 0, 0, 0, 0, 1, 0, 0, 0, 0, 0, 0 },
    { 0, 0, 0, 1, 0, 1, 0, 1, 0, 0, 0, 0 },
    { 0, 0, 1, 0, 0, 1, 0, 0, 1, 0, 0, 0 },
    { 0, 0, 1, 0, 0, 0, 0, 0, 1, 0, 0, 0 },
    { 0, 0, 1, 0, 0, 0, 0, 0, 1, 0, 0, 0 },
    { 0, 0, 1, 0, 0, 0, 0, 0, 1, 0, 0, 0 },
    { 0, 0, 0, 1, 0, 0, 0, 1, 0, 0, 0, 0 },
    { 0, 0, 0, 0, 1, 1, 1, 0, 0, 0, 0, 0 }
  };
  matrix.renderBitmap(frame, 8, 12);
}

void showUp() {
  byte frame[8][12] = {
    { 0, 0, 0, 0, 0, 1, 0, 0, 0, 0, 0, 0 },
    { 0, 0, 0, 0, 1, 1, 1, 0, 0, 0, 0, 0 },
    { 0, 0, 0, 1, 0, 1, 0, 1, 0, 0, 0, 0 },
    { 0, 0, 0, 0, 0, 1, 0, 0, 0, 0, 0, 0 },
    { 0, 0, 0, 0, 0, 1, 0, 0, 0, 0, 0, 0 },
    { 0, 0, 0, 0, 0, 1, 0, 0, 0, 0, 0, 0 },
    { 0, 0, 0, 0, 0, 1, 0, 0, 0, 0, 0, 0 },
    { 0, 0, 0, 0, 0, 1, 0, 0, 0, 0, 0, 0 }
  };
  matrix.renderBitmap(frame, 8, 12);
}

void showDown() {
  byte frame[8][12] = {
    { 0, 0, 0, 0, 0, 1, 0, 0, 0, 0, 0, 0 },
    { 0, 0, 0, 0, 0, 1, 0, 0, 0, 0, 0, 0 },
    { 0, 0, 0, 0, 0, 1, 0, 0, 0, 0, 0, 0 },
    { 0, 0, 0, 0, 0, 1, 0, 0, 0, 0, 0, 0 },
    { 0, 0, 0, 0, 0, 1, 0, 0, 0, 0, 0, 0 },
    { 0, 0, 0, 1, 0, 1, 0, 1, 0, 0, 0, 0 },
    { 0, 0, 0, 0, 1, 1, 1, 0, 0, 0, 0, 0 },
    { 0, 0, 0, 0, 0, 1, 0, 0, 0, 0, 0, 0 }
  };
  matrix.renderBitmap(frame, 8, 12);
}

void showLeft() {
  byte frame[8][12] = {
    { 0, 0, 0, 0, 0, 0, 0, 0, 0, 0, 0, 0 },
    { 0, 0, 0, 0, 1, 0, 0, 0, 0, 0, 0, 0 },
    { 0, 0, 0, 1, 0, 0, 0, 0, 0, 0, 0, 0 },
    { 0, 0, 1, 1, 1, 1, 1, 1, 1, 1, 0, 0 },
    { 0, 0, 0, 1, 0, 0, 0, 0, 0, 0, 0, 0 },
    { 0, 0, 0, 0, 1, 0, 0, 0, 0, 0, 0, 0 },
    { 0, 0, 0, 0, 0, 0, 0, 0, 0, 0, 0, 0 },
    { 0, 0, 0, 0, 0, 0, 0, 0, 0, 0, 0, 0 }
  };
  matrix.renderBitmap(frame, 8, 12);
}

void showRight() {
  byte frame[8][12] = {
    { 0, 0, 0, 0, 0, 0, 0, 0, 0, 0, 0, 0 },
    { 0, 0, 0, 0, 0, 0, 0, 1, 0, 0, 0, 0 },
    { 0, 0, 0, 0, 0, 0, 0, 0, 1, 0, 0, 0 },
    { 0, 0, 1, 1, 1, 1, 1, 1, 1, 1, 0, 0 },
    { 0, 0, 0, 0, 0, 0, 0, 0, 1, 0, 0, 0 },
    { 0, 0, 0, 0, 0, 0, 0, 1, 0, 0, 0, 0 },
    { 0, 0, 0, 0, 0, 0, 0, 0, 0, 0, 0, 0 },
    { 0, 0, 0, 0, 0, 0, 0, 0, 0, 0, 0, 0 }
  };
  matrix.renderBitmap(frame, 8, 12);
}

void clearScreen() {
  byte frame[8][12] = {
    { 0, 0, 0, 0, 0, 0, 0, 0, 0, 0, 0, 0 },
    { 0, 0, 0, 0, 0, 0, 0, 0, 0, 0, 0, 0 },
    { 0, 0, 0, 0, 0, 0, 0, 0, 0, 0, 0, 0 },
    { 0, 0, 0, 0, 0, 0, 0, 0, 0, 0, 0, 0 },
    { 0, 0, 0, 0, 0, 0, 0, 0, 0, 0, 0, 0 },
    { 0, 0, 0, 0, 0, 0, 0, 0, 0, 0, 0, 0 },
    { 0, 0, 0, 0, 0, 0, 0, 0, 0, 0, 0, 0 },
    { 0, 0, 0, 0, 0, 0, 0, 0, 0, 0, 0, 0 }
  };
  matrix.renderBitmap(frame, 8, 12);
}

void printWifiStatus() {
  // print the SSID of the network you're attached to:
  Serial.print("SSID: ");
  Serial.println(WiFi.SSID());

  // print your board's IP address:
  IPAddress ip = WiFi.localIP();
  Serial.print("IP Address: ");
  Serial.println(ip);

  // print the received signal strength:
  long rssi = WiFi.RSSI();
  Serial.print("signal strength (RSSI):");
  Serial.print(rssi);
  Serial.println(" dBm");
}
然后就没然后……不过下一步可能看看如何让网页的声音可以在后台播放。我现在用iOS和chrome,如果把直播画面放到画中画,就可以在后台继续听直播。但是如果不用画中画,当我把屏幕关闭的时候,声音就会中断了,体验挺不好的,反正……
如何一键使用树莓派搭建RTMP直播服务
10年前,我写过一篇文章,给大家介绍了一下如何用最低的成本转播PlayStation 4到国内的直播平台。简单来说,就是用PS4自带的直播功能,推流到twitch,并使用树莓派截取信号并重新推送到其他的直播平台。这样做的好处是,不需要购买昂贵的视频采集卡,只需要一个树莓派就可以了。
10年后,我又有了类似的需求,只不过这次,我想做的是自己搭建一个直播服务来输出视频信号,这样,无论我身处何地,都可以通过网络来观看自己的视频。
当然,和10年前不同的,这次我购买了昂贵的视频采集卡,以及新的树莓派。并且,当时我研究了很久如何配置服务器之类的,这次chatgpt帮我一波搞定,并且连脚本都给我写好了。稍微调整一下就能用。所以也在这里分享给大家。这次的思路是,用树莓派搭建一个RTMP服务,然后用我的台式机将视频采集卡采集的内容通过OBS推给树莓派,这样我就可以通过VLS甚至浏览器直接观看内容了。
#!/bin/bash

# Raspberry Pi 5 RTMP Streaming Server Setup Script
# Installs NGINX with RTMP, configures HLS, and sets up systemd service

set -e

echo "🚀 Updating system..."
apt update && apt upgrade -y

echo "📦 Installing dependencies..."
apt install -y build-essential libpcre3 libpcre3-dev libssl-dev zlib1g-dev git wget

echo "🌐 Downloading NGINX and RTMP module..."
cd /opt
git clone https://github.com/arut/nginx-rtmp-module.git
wget http://nginx.org/download/nginx-1.27.5.tar.gz
tar -zxvf nginx-1.27.5.tar.gz
cd nginx-1.27.5

echo "⚙️ Building NGINX with RTMP module..."
./configure --with-http_ssl_module --add-module=../nginx-rtmp-module
make -j$(nproc)
make install

echo "📝 Writing NGINX config with RTMP + HLS..."
cat > /usr/local/nginx/conf/nginx.conf <<EOF
worker_processes  1;

events {
    worker_connections  1024;
}

http {
    sendfile off;
    tcp_nopush on;
    directio 512;

    server {
        listen 8080;

        location / {
            root html;
            index index.html index.htm;
        }

        location /hls {
            types {
                application/vnd.apple.mpegurl m3u8;
                video/mp2t ts;
            }
            root /tmp;
            add_header Cache-Control no-cache;
            add_header 'Access-Control-Allow-Origin' '*';
        }
    }
}

rtmp {
    server {
        listen 1935;
        chunk_size 4096;

        application live {
            live on;
            record off;
            hls on;
            hls_path /tmp/hls;
            hls_fragment 3s;
            hls_playlist_length 60s;
        }
    }
}
EOF

echo "📁 Creating HLS output directory..."
mkdir -p /tmp/hls

echo "🔧 Creating systemd service for NGINX RTMP..."
cat > /etc/systemd/system/nginx-rtmp.service <<EOF
[Unit]
Description=NGINX RTMP Streaming Server
After=network.target

[Service]
ExecStart=/usr/local/nginx/sbin/nginx
ExecReload=/usr/local/nginx/sbin/nginx -s reload
ExecStop=/usr/local/nginx/sbin/nginx -s stop
PIDFile=/usr/local/nginx/logs/nginx.pid
Type=forking
Restart=on-failure

[Install]
WantedBy=multi-user.target
EOF

echo "🔁 Enabling and starting NGINX service..."
systemctl daemon-reexec
systemctl daemon-reload
systemctl enable nginx-rtmp
systemctl start nginx-rtmp

echo ""
echo "✅ All done!"
echo ""
echo "🎥 Set OBS to stream to: rtmp://<RPI_IP_ADDRESS>/live/<key>"
echo "📺 Watch via VLC or player: rtmp://<RPI_IP_ADDRESS>/live/<key>"
echo "🌐 Or in browser (HLS): http://<RPI_IP_ADDRESS>:8080/hls/<key>.m3u8"
记得用sudo run一下就好了……这个脚本会帮你自动下载nginx和rtmp插件,自动编译和安装,自动配置,自动设置自动启动……
欢迎讨论……
酒后乱语(音乐)
查了一下,博客已经一年多没有更新了,今晚吃着鸡架和烤鱿鱼,喝了点朗姆可乐,有点感触,所以回来写篇文章。可能明天早上我就已经不记得今天都写过啥了。但是,这是自己的博客,忘了又怎样呢?
在过去的一年,我的身上也发生了很多事情,比如买房,搬家,生娃,公司裁员。虽然暂时没有裁到自己头上,但是也有种劫后余生的感觉。总之,听我播客的朋友应该可以体会到,我去年是有多么风雨飘摇。
但是今天想聊的不是我去年的生活,而是通过今晚喝的朗姆可乐,回忆起的中学时的一段往事。自从上大学,我养成了一个毛病,那就是周五晚上必须要稍微来一杯,虽然这个习惯由于某些原因暂停了一段时间,但是,周五晚上还是必须要得吃点好的。于是,今晚也是同样借着周五晚上,吃了一波烤鸡架和烤鱿鱼。由于是周五晚上嘛,叫外卖的等待时间比较久,于是我就跑去店里买了瓶朗姆酒,正好家里有冰可乐,于是在家鼓捣起了朗姆可乐。
说起来,朗姆可乐,也叫自由古巴,可能是肉壳第一款有概念的鸡尾酒。虽然我自己喝过的第一款广义上的鸡尾酒是7-11里买的杰克丹尼可乐,但是朗姆可乐在我的心目中还是有些和其他鸡尾酒不一样的地位。
大概,那还是我上初中的时候吧,在我很早以前写的文章改变自己的三首歌中,我提到过我爸给我买过的一套5张CD的精选集,让我喜欢上了欧美老歌,后来初中时,那5张CD都被我听了无数遍了,就开始在家里找找看有没有什么其他的CD,结果还真的被我找到了好多。其中有一张,我已经不太记得专辑里的其他歌曲了,但是里面有一首Rum & Coca-Cola让我印象深刻。虽然后来才知道演唱的是The Andrews Sisters,但这已经是后话了。当时年纪还小,也不喝酒,所以对Rum是什么并没有什么概念。但是吧,我还是知道Coca-Cola也就是可口可乐是什么。所以对这首歌就会有些特别的印象,外加歌曲本身欢快的节奏也非常得我心,于是就搜了一下这首歌的歌名,才知道了朗姆可乐这款鸡尾酒。也就像是我说的,这是我第一款有概念的鸡尾酒。
说个小插曲,我司内部的某个工具名叫Daiquery,这工具的图表示一个马提尼杯,就是那种V字形的高脚杯。我之前一直不知道为什么要用这个图标。最近才知道,这是因为这个工具的名字和Daiquiri这款鸡尾酒很像。只不过Daiquiri好像用玛格丽特杯多一点。
回到正题,你们懂得,喝了点酒嘛,就想找点歌听,于是在Spotify和Youtube上,以Rum & Coca-Cola开始搜起来。然后我突然意识到,现在的人们,想找首歌是多么的容易,只要你知道这首歌叫什么,几乎就没有找不到的。总有一款音乐App或者视频App能找到你想要的歌。真的非常羡慕现在的人,想要找一些在本时代相对冷门的音乐,是多么的容易。回想起15,20年前,在网络还不是那么发达的时代。因为我喜欢的音乐品类比较另类,即使在今天,和同龄人也没有什么共同话题。我最期待我妈带我,或者和朋友一起去淘打口盘。每次都能找到一些我认识的,或者我不认识的歌手。买盘回家一遍一遍的听。但是呢,能买到的盘终究是少数。想要知道更多的歌手,或者歌曲,还得自己想办法从网上找。也是在那个时候,我知道了熊猫音乐网(Panda123),关于这件事,我在刚才提到的改变自己的三首歌和纪念老熊猫这篇文章中都有提及,这里就不赘述了。就是这歌网站,让我接触到了更多喜爱爵士乐和轻音乐的朋友,也让我开始了解到了很多相关的知识。说起来,这也是我在自己的播客中开办老声常弹节目的灵感源泉。
除了自己淘打口盘,以及熊猫音乐网,另外一个对我很有帮助的工具,是高中时,泽少介绍给我的一个软件,名字叫做soulseek。令我惊讶的是,时至今日,这个工具还一直存在,甚至到2021年还在更新。在我高中那会儿,P2P下载盛行,什么BT,电驴什么的,全都有。只可惜,中文互联网还是很少有我喜欢的音乐资源的下载。于是这款soulseek就变成我的宝贝工具。这样是一款P2P软件,但是专注于音乐分享。于是我就用这款软件,下载了很多音乐,时至今日,我的硬盘里,还有很多当年下载的mp3。虽然,我已经很少听了。但是这确实是我自己的一段珍贵的回忆。时至今日,在我听到某一首歌的时候,我还能回忆起第一次听到,或者第一次记住,亦或者是我经常听这首歌的时候,眼前浮现的场景。也确实是一段非常有趣的经历吧。
如今,我已经是一个30多岁的大叔,俨然不是那个初中高中的小孩子了,但是我的音乐喜好却一直没有改变过,他们带给我的,除了此时此刻身心的愉悦,也能帮我助我回忆起以前的快乐时光。可能,对于音乐类型的偏好,我这辈子都不会有什么特别大的改变了。但是我觉得这样也挺好的,不是么?
如何升级大气层Atmosphere到1.1.0以及以上版本
最近搬家太忙了,Switch吃灰了几个月。虽然没有想玩什么新游戏,但是就是想给系统啥的升个级。看到大气层又升级了好几个版本呢,而且1.1.0有个大更新。虽然我不知道都更新了啥,但是根据描述来说,原来的的几个重要文件都被改名了,非常的莫名其妙……比如fusee-primary.bin改成了fusee.bin, fusee-secondary.bin改成了package3。所以,在从1.1.0之前的版本更新到1.1.0的版本以及以后的版本,就不是简单的复制粘贴这么简单了。所以在这里记录一下,以防以后忘了……
先说一下我目前的NS的状态,unpatched的NS,目前的版本是大气层0.19.4版,双系统,OFW也就是正版系统还是9.x,CFW也就是盗版系统是12.0.3. hekate是5.5.7。这个教程只在我自己的NS上尝试过,破解有风险,大家自己承担哈。
在这个教程里,我只告诉大家如何升级大气层,至于怎么升级系统,请看这里。方法没变,就是注意版本号就好了,直接选最新的就行了。
另外,我是用的注入器是TegraRcmGUI,这个东西的用处就是选择想要通过哪个文件来引导启动系统。之前写的教程里有提到过这个东西,可以自己看一下。
另外感谢下面的教程教会我如何升级
https://nh-server.github.io/switch-guide/extras/updating/
首先,我们开始下载一堆东西。
Atmosphère 1.2.0 prerelease
- 这个是大气层的主文件,以及引导文件,1.2.0是个预发布版本,我个人比较喜欢用新版本,所以就下的最新的。如果我说,在之前的教程里,下载的第二个文件叫fusee-primary.bin,现在叫fusee.bin了。
- https://github.com/Atmosphere-NX/Atmosphere/releases
- atmosphere-1.2.0-prerelease-f7f83b474+hbl-2.4.1+hbmenu-3.4.1.zip
- fusee.bin
Sigpatches (Supports HOS firmware 13.0.0 and AMS 1.2.0-prerelease)
- 这个是大气层的一个补丁,用于支持13.0.0的Switch系统版本
- https://github.com/ITotalJustice/patches/releases
- fusee.zip
hekate v5.6.3 & Nyx v1.0.8
- 相当于一个loader,用于引导系统的
- https://github.com/CTCaer/hekate/releases
- hekate_ctcaer_5.6.3_Nyx_1.0.8.zip
hekate_ipl.ini
- hekate的配置文件
- https://nh-server.github.io/switch-guide/files/emu/hekate_ipl.ini
- hekate_ipl.ini
先来总结一下我们现在有哪些文件了
- atmosphere-1.2.0-prerelease-f7f83b474+hbl-2.4.1+hbmenu-3.4.1.zip
- fusee.bin
- fusee.zip
- hekate_ctcaer_5.6.3_Nyx_1.0.8.zip
- hekate_ipl.ini
后面提到某个文件的时候,我会用代号来指代。
首先,我们先看SD卡里都有什么。

就是这些文件,首先,我们先删除3个文件,第一个是这张图里的sept这个文件夹,第二个是hekate_ctcaer_5.5.7.bin

第三个是atmosphere文件夹里的fusee-secondary.bin。
然后将1,3,4都解压到电脑本地的同一个目录下。

得到这些文件。然后把5,也就是hekate_ipl.ini这个文件复制到上图中bootloader的文件夹里。之后把这个文件夹里的内容,复制到SD卡中并覆盖同名文件。
然后把SD卡放回到NS上,通过TegraRcmGUI,使用hekate_ctcaer_5.6.3.bin来启动系统到Hekate。
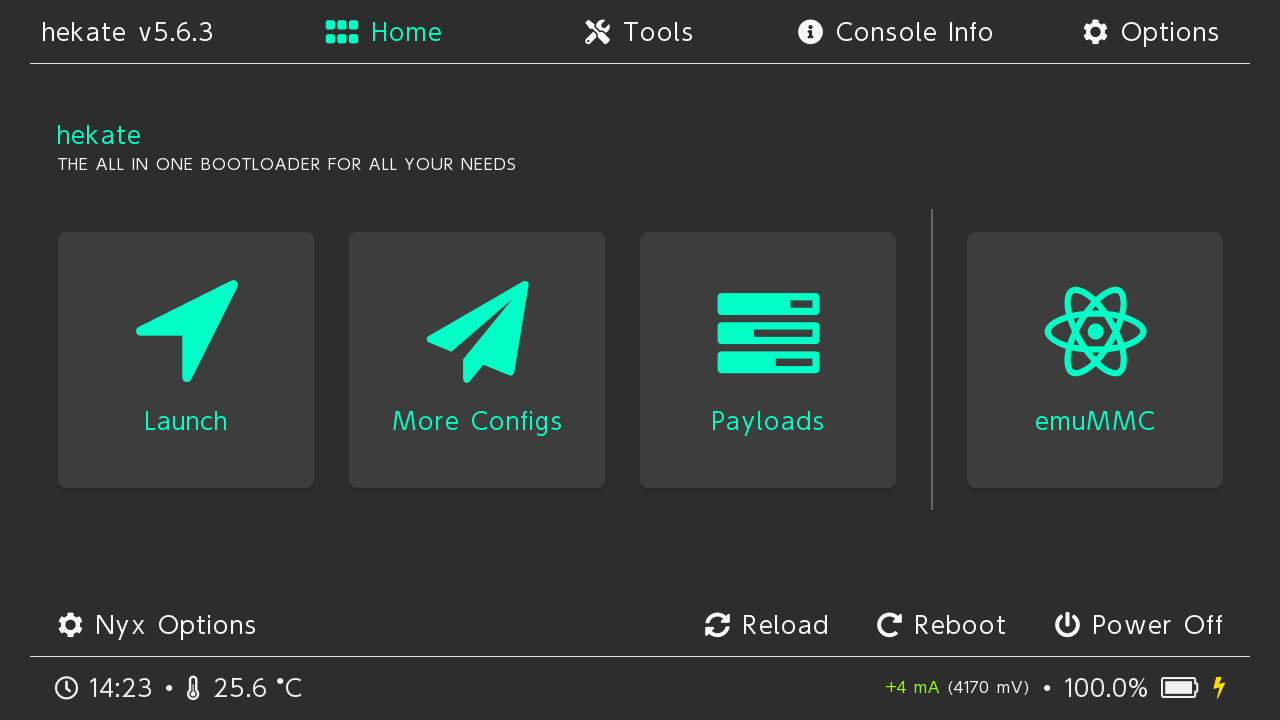
点击右上角的Options

确认右下角的Update Reboot 2 Payload是ON,如果不是,点一下让他变成ON。然后就可以Save Options,并且关机了。
之后,再通过TegraRcmGUI,使用fusee.bin来启动机器,就大功告成了。

可以看到,我的AMS也就是大气层系统的版本号已经是1.2.0了。(版本号中的最后一个字母是E,说明这是虚拟系统,如果是运行在真实系统里,最后一个字母是S)
大功告成!